
How to enable G-Sync Compatible on a Freesync monitor

This guide shows the requisites to use Freesync with a Nvidia GPU, how to enable and test G-Sync, and the ways to solve flickering and stuttering issues.
I have realized that many gamers do not know if and how they can enable Freesync on their PC. Considering the impact of this technology in our games, I believe that Nvidia should alert when it is potentially available with our GPU + Monitor combo. Hopefully, the guide below will clear all your doubts!
Requisites to use Freesync with a Nvidia GPU
Only Windows 10 users can enable it. All the previous versions - including Windows 7 and 8 - are not compatible.
Nvidia added support for Linux with the 418.30 Beta Driver at the end of January. Note: I do not utilize this operative system, so I don’t know how well it works and if there is any limitation.
A monitor with Freesync. Nvidia released a short list of officially compatible displays, but I suggest checking out the unofficial list I have posted because it contains info on hundreds of monitors.
A 10xx or 20xx series Nvidia GPU. All the previous series are not supported, and probably they will never be due to their lack of DisplayPort 1.2a.
The monitor must have DisplayPort 1.2a or better. Older versions of DisplayPort are not compatible.
Some screens are able to utilize Freesync also via HDMI, but the Nvidia implementation does not accept this port.
Nvidia GPU drivers 417.71 or newer. The support to G-Sync Compatible has been added starting with this driver version.
If you would like to know which driver version works the best at the moment, check out this article with benchmarks and tests on all the drivers from 399.24 onwards.
Set up G-SYNC on the Nvidia control panel
How to enable G-Sync
Turn Freesync to on in your monitor OSD. Note that not all the monitors have this option. For example, Freesync is enabled automatically in some Acer models if you select DisplayPort 1.2 or above in the monitor settings.
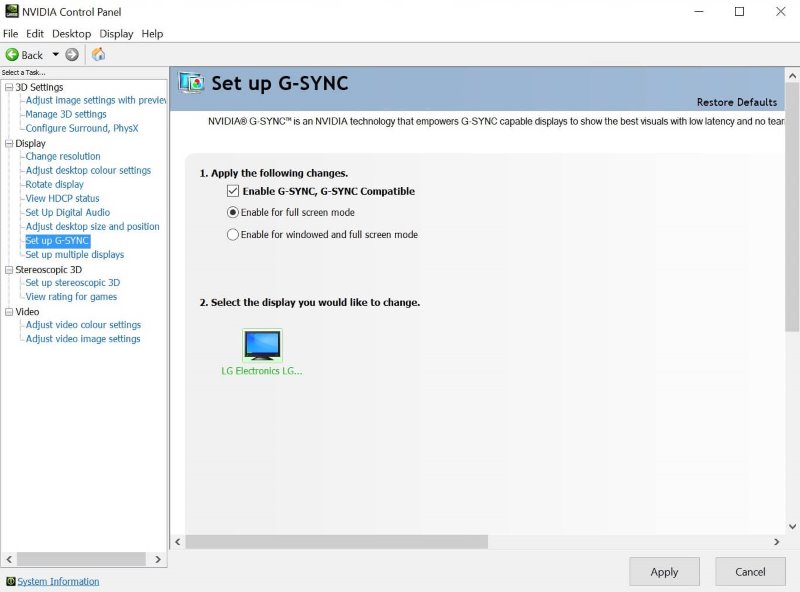
Open the Nvidia Control Panel and go to Display > Set up G-SYNC, and check mark “Enable G-SYNC, G-SYNC Compatible”.
Select if you want to enable it for full screen mode only or for both windowed and full screen mode, and then the monitor that must use these settings (be sure that only one display is selected).
Finally, click Apply on the Control Panel to save the changes.
Test if G-Sync Compatible works
It is time to find out if G-Sync Compatible is working correctly:
Some monitors have a refresh overlay option on the OSD. If yours have it, just enable it and start a game; you will notice that the refresh rate changes based on your fps. This is the simplest option, but not everyone can use it.
Download the G-Sync Pendulum Demo. It is a tool developed by Nvidia to show how G-Sync improves our gaming performance by eliminating tearing and minimizing stutter and lag. If you have no problems with this test, most probably also your games will work properly.
Finally, start a game and check out if there is any screen tearing, stuttering, flickering, or artifacts of any kind. Hopefully, everything will work perfectly, but sometimes you will have issues that may be fixed or not.

The G-Sync Pendulum demo - Nvidia
Potential solutions
If G-Sync isn’t working, or you are experiencing problems, the solutions below might save the day:
Turn your monitor and PC off and on. This is not a joke :P.
Use DDU (Display Driver Uninstaller) to clean your current GPU drivers and make a fresh install.
Unplug/plug back your monitor, and change your DisplayPort on the OSD from 1.2 to 1.1 and then back to 1.2.
Try a different Overdrive settings. Usually, “Normal” is the best choice if you are experiencing issues.
Select a different refresh rate, and eventually try limiting it to a custom value.
Try alt-tabbing if the problem takes place during a game.
Change the Power Settings on the Nvidia control panel to Maximum Performance.
Change the Freesync Range
If you check out the possible solutions indicated by the community in this list, you will notice that some Freesync displays work flawlessly at a certain fps range, but they have problems when going below or above a certain range.
With CRU (Custom Resolution Utility) you can edit the Freesync Range. Sometimes you can extend your range values, but others you must reduce them to avoid issues.
With RTSS (Riva Tuner Statistics Server) you can limit your fps using “Framerate Limiter”. Some Freesync monitors have problems when your framerate is either too low or too high. With RTSS you can cap it to a few fps below the maximum Hz supported by your monitor.
About the lower end, just decrease your graphic settings so that you won’t drop below a certain amount of fps. Some users reported that their screens flicker when below the Freesync range.
Header image: Nvidia